Hello guys, hows it going, huh?
Today I am going to share you an extremely wild story about how I automated taking a screenshot of every single Pokémon in game!
The journey starts with a problem of not having every Pokémon in game. I mean.. Who does?
After all.. I am not going to ‘catch ’em all’, now am I? No! I am a programmer, not a Pokémon trainer..
First step was of course to get renders of all Pokémons.. Shouldn’t be too hard, right? Just manipulate, or more precisely.. Man in the middle the connection between my phone and the server, fake that the server sent every Pokémon in game and.. there we go, right?
After quick research I found this implementation in GitHub called Pokemon Go MITM Proxy by a nickname rastapasta, so I tried to setup it in Windows environment.. No luck.. obviously.. Its also documented in the repo that its hard to compile..
After recovering from the disappointment I cloned the repo on my Linux server and ran it there, installation went smoothly and I was ready to go!
Unfortunately there’s still need for root or removal of certificate pinning, but gladly from my last post I had a patch ready to go! So no worries! I installed the certificate as documented from the server and ran an example script that would replace all my pokémons, and I was good to go!
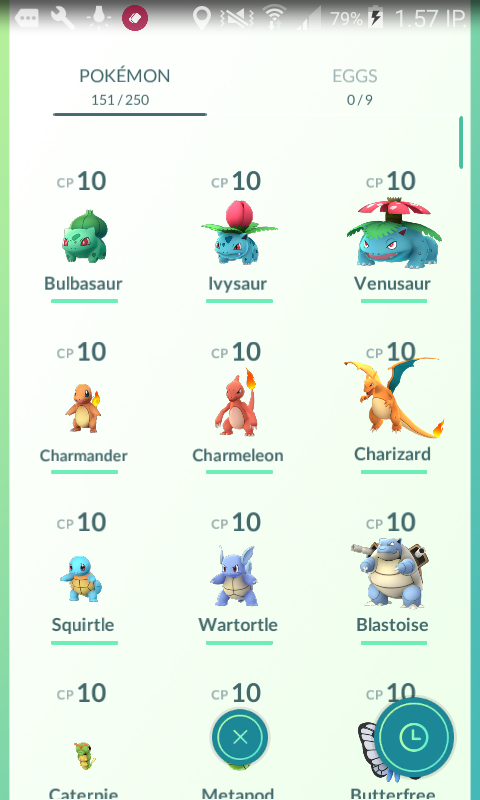
When I ran Pokémon Go after this, I ended up getting a list like this, however it wasn’t enough.. The example would only replace the Pokémons I had with others, but what I really needed is it to clear my Pokémons and add all Pokémons in increasing ids..
So its time to edit the script.. So I opened example.replacePokemons.coffee but coffeescript wasn’t too familiar with me.. Nor was the structure of packets, so first of all I had to lookup coffeescripts syntax before anything. It wasn’t too bad knowing Javascript, but required some effort to get through, but I found also this js2coffee compiler online I could use when stuck.
So the smallest modification I could get through with is remove all the code touching the pokemons, and craft a piece of code that replaces whole inventory with inventory cotaining an item with PlayerStats and all available Pokémons.
As funny as it sounds, PlayerStast too are passed as an InventoryItem.. Smart..
The minimal implementation I was left with is as follows:
PokemonGoMITM = require './lib/pokemon-go-mitm'
fs = require 'fs'

server = new PokemonGoMITM port: 8081
	.addResponseHandler "GetInventory", (data) ->
		if data.inventory_delta
			data.inventory_delta.inventory_items = [
				{
					inventory_item_data: {
						player_stats: {
							level: 99,
							experience: 999999,
							prev_level_xp: 1,
							next_level_xp: 1,
							km_walked: 0,
							pokemons_encountered: 2,
							unique_pokedex_entries: 1,
							pokemons_captured: 2,
							poke_stop_visits: 0,
							pokeballs_throws: 0,
							pokemon_caught_by_type: Int32Array.from([]),
							small_rattata_caught: 0
						}
					}
				}
			];

			for i in [1..151]
				data.inventory_delta.inventory_items.push({
						inventory_item_data: {
							pokemon_data: {
								id: i,
								pokemon_id: i,
								cp: 10,
								stamina: 10,
								stamina_max: 10,
								move_1: "QUICK_ATTACK_FAST",
								move_2: "AIR_CUTTER",
								height_m: 0.29903167486190796,
								weight_kg: 1.878556489944458,
								individual_attack: 1,
								individual_defense: 14,
								individual_stamina: 15,
								cp_multiplier: 0.09399999678134918,
								pokeball: "ITEM_POKE_BALL",
								captured_cell_id: "5082605749092220928",
								creation_time_ms: "1468915294161"
							}
						}
					});
		data
I am not even sure if all of this is required.. But its pretty straightforward.. Replace inventory_items with array containing just PlayerStats, then add 151 Pokemons with ids 1-151 and be fone with it!
The end result is.. well the same as the previous as I was too lazy to run the initial version of replacePokemons to get the real initial result sooo.. Now we’re left with just taking a screenshot of every Pokémon.. Should be easy.. right!
For our good you can scroll the list of Pokémons by swiping so capturing screenshot should be easy as taking screenshot with Pokémon id as name, then swipe predefined amount, sleep 10 seconds to let the model load, and repeat!
A little Windows shell script I made is as follows:
FOR /L %%G IN (1,1,151) DO (
	adb screencap -p /sdcard/%%G.png
	adb pull /sdcard/%%G.png
	adb shell input touchscreen swipe 400 350 200 350
	ping 127.0.0.1 -n 11 > nul
)

pause
Its pretty simple!
- Repeat from 1 to 151
- Take a screenshot with naming it with looper number
- Pull the screenshot from the sdcard to the working directory
- Evaluate a swipe, from right to left, changing the Pokémon on the screen
- Sleep for ten seconds, because this is not implemented in a simple sleep fashion, ping 11 times and get approximately a 10 second delay
After running this for.. let me calculate.. approx 30 minutes.. we’re done, and have a folder full of images!
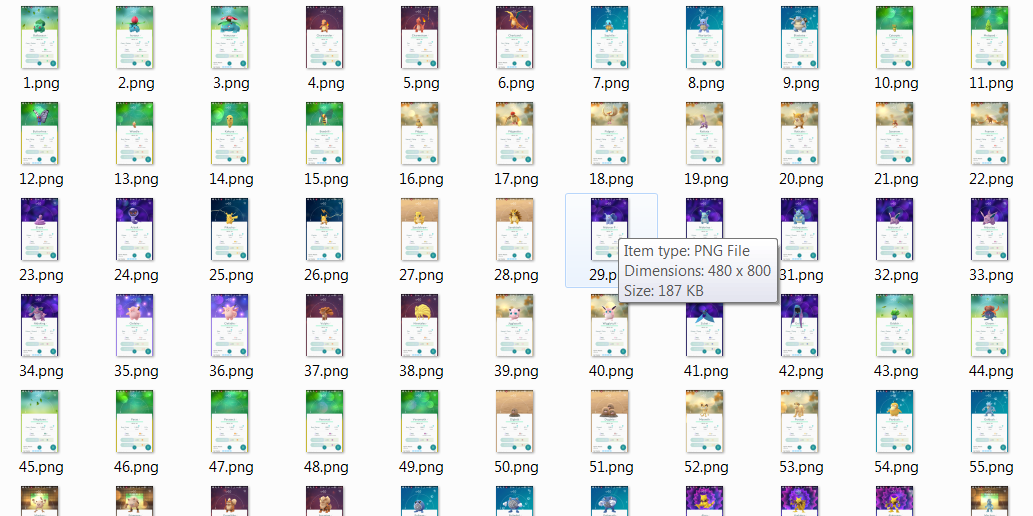
As you can see, we’re good, and as far as this glimpse tells me.. we did fine! Now its time to get on with these pictures.. but that’s a topic for another blog.. Thanks for reading!